
How to Make a Bouncing Ball Video Synced to Music (Complete 2026 Guide)
Everything you need to make a bouncing ball that plays a song, how music-synced physics works, a full step-by-step BallEngine workflow, MIDI and scale tips, and how to publish.
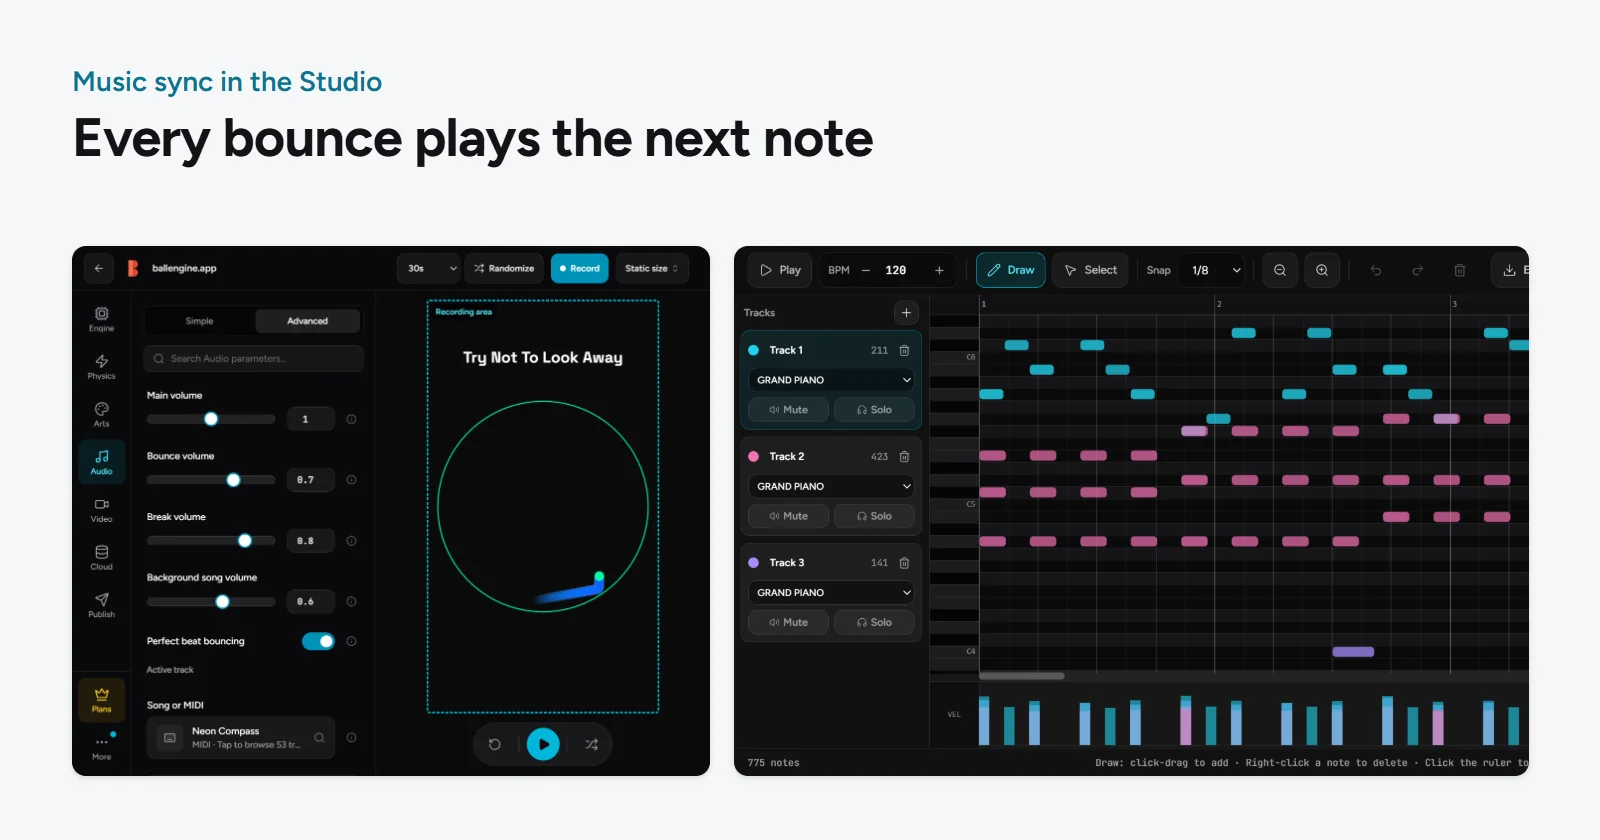
How to Make a Bouncing Ball Video Synced to Music (The Complete Guide)
You have seen the videos. A single ball drops into a spinning ring, and every time it clips the wall it plays the next note of a familiar song. The ball speeds up, the container grows, notes cascade into a melody, and forty seconds later you have watched a physics simulation *perform* an entire chorus. These clips rack up millions of views on TikTok, Reels, and YouTube Shorts because they merge two things the brain cannot look away from: motion that resolves and music that resolves. This guide teaches you exactly how they are made, from the underlying concept to the precise workflow, using BallEngine, a browser-based physics studio built specifically for this format. By the end you will be able to make a bouncing ball that plays a song from scratch, with no coding, no animation experience, and no video editing.
Key takeaways
- A music-synced bouncing ball works by mapping each collision to the next note of a melody, so the physics literally plays the song note by note.
- You do not animate anything by hand. You set physics rules, load a song, and let the simulation generate a unique, deterministic performance.
- The two ways to supply the music are importing a MIDI file (exact melody) or picking a built-in musical scale (procedural, always-in-tune notes).
- The craft is in tuning physics so collisions land on the beat: bounce frequency, gravity, restitution, container shape, and ball speed all matter.
- BallEngine handles the hard parts: a Rhythmic Mode that advances notes on each bounce, an Audio Studio for MIDI and scales, and one-click 9:16 export up to 4K/60fps.
- Once rendered, you can publish or schedule straight to TikTok, YouTube, Instagram and more, including hands-off recurring Autopilot posting.
What a Music-Synced Bouncing Ball Video Actually Is
At its simplest, a music sync bouncing ball simulation is a physics scene where the audio is driven by events instead of a timeline. In a normal music video, the song plays on a fixed track and the visuals are edited to match it. Here it is the opposite: the visuals happen first, and the sound is a *consequence* of what the physics does. When the ball hits something, a note fires. When nothing collides, the scene is silent. String enough well-timed collisions together and the simulation plays a melody the way a music box plays one when its cylinder turns.
This is why the format feels alive rather than edited. There is no backing track hiding under the visuals. The ball genuinely earns each note by colliding, and your brain can see the cause of every sound. That tight cause-and-effect loop is the entire appeal, and it is the reason these clips hold attention far longer than a static loop or a filtered stock video.
In a synced ball video the physics is the instrument and the collisions are the keys. The ball is not following the music. The music is following the ball.
The genre goes by many names: music ball simulator, midi ball simulator, satisfying physics loop, or simply a bouncing ball that plays a song. Under the hood they all share the same trick, which we will unpack next.
The Core Concept: Collisions as Musical Triggers
To build one of these, you need to understand a single idea deeply: a melody is just an ordered list of notes, and a bouncing ball produces an ordered list of collisions. If you line those two lists up so that collision number one plays note number one, collision number two plays note number two, and so on, the ball walks through the song one bounce at a time. This is exactly what BallEngine's Rhythmic Mode does automatically.
The note pointer
Think of the melody as sheet music laid flat and a pointer resting on the first note. Every time the physics engine registers a qualifying collision, it plays the note under the pointer and then advances the pointer by one. The next bounce plays the next note. When the pointer reaches the end of the song it either stops or loops back to the beginning. This pointer model is the heart of every music-synced ball video, whether the underlying tool calls it Rhythmic Mode or something else.
Because the note order is fixed but the collision *timing* comes from live physics, every render has the same melody but a slightly different feel. Speed up the ball and the song plays faster. Add more balls and notes stack into chords. Change the container and the rhythm of the bounces changes. The melody is locked; the performance is yours to shape.
Why this beats syncing by hand
You could, in theory, animate a ball and then hand-place audio clips at each bounce in a video editor. People did exactly that in the early days, and it took hours per clip. The event-driven approach removes all of that labor. You never touch a timeline. You define the rules, and the simulation produces a performance that is correct by construction, because the note only ever plays when a real collision happens. That is the difference between editing a video and generating one, and it is why a dedicated physics video generator can turn out a finished clip in minutes.
The mental model to hold onto: your song is a queue of notes, and each bounce pops the next note off the front of the queue. Everything else is just making the bounces happen at pleasing intervals.
MIDI vs. Musical Scales: Two Ways to Supply the Music
There are two fundamentally different ways to tell the simulation what notes to play, and choosing the right one is the first real decision you will make. BallEngine's Audio Studio supports both: importing a MIDI file, or selecting a built-in musical scale and key.
Option 1: Import a MIDI file
A MIDI file is a compact instruction sheet for a song. It does not contain any recorded audio; it contains the notes, their pitches, their order, and their timing, exactly the data a midi ball simulator needs. When you import a MIDI file, the simulation reads that note list and feeds it to the note pointer. The result is that the ball plays the actual recognizable melody of the song, note for note. This is the option to choose when you want viewers to instantly know the tune.
MIDI files for thousands of melodies are freely available online, and many creators keep a small library of the hooks that perform well. If you have a melody in your head that you want the ball to play, sourcing a clean MIDI of just the lead line is the most reliable path to a recognizable result.
Option 2: Pick a musical scale
If you do not have a MIDI file, or you want an original, endlessly loopable sound rather than a specific song, you use a scale instead. A musical scale is a set of notes that sound good together. When you select a scale and key, the simulation draws each successive note from that scale, so every bounce is guaranteed to be in tune no matter how chaotic the physics gets. There is no wrong note in a scale, which makes this approach almost foolproof for beginners and ideal for ambient, hypnotic loops.
Scales are also the safest choice for original content, because you are not reproducing a copyrighted composition, you are generating a fresh sequence of pleasant tones. Many of the most-shared satisfying loops use nothing more than a pentatonic scale, which sounds consonant in almost any order.
| Consideration | MIDI Import | Musical Scale |
|---|---|---|
| Result | Plays a specific, recognizable song | Original, always-in-tune tones |
| Setup effort | Source and load a MIDI file | Pick a scale and key from a menu |
| Best for | Cover-style clips of known melodies | Ambient loops and original content |
| Note order | Exactly as written in the file | Drawn from the scale as bounces fire |
| Copyright care | Depends on the underlying composition | No composition reproduced |
| Skill needed | None, but a clean melody MIDI helps | None at all |
New to this? Start with a pentatonic scale for your very first video. It removes any chance of a sour note and lets you focus entirely on the physics. Move to MIDI once you want the ball to play a tune people recognize.
What You Need Before You Start
One of the reasons this format has exploded is that the barrier to entry is almost nothing. You do not need a powerful computer, a music background, or any software to install. Here is the honest list of what actually matters.
- A web browser. BallEngine runs entirely in the browser at ballengine.app, so there is nothing to download or install.
- A song idea. Either a MIDI file of a melody you want to reproduce, or simply a mood if you plan to use a scale.
- A free account. You can sign up and start building at no cost; paid tiers add higher resolution and more exports later.
- About fifteen minutes. Your first clip will take a little longer as you learn the controls; after that you will move fast.
- No coding, no animation, and no video editing skills. If you can drag a slider and press record, you have everything required.
That last point is worth sitting with. This is a genuinely faceless-friendly format. You never appear on camera, never record your voice, and never touch a traditional editor, because BallEngine collapses a full production pipeline into a browser tab. If you are building a faceless channel around physics simulations, this is close to the lowest-effort, highest-ceiling format available.
Step-by-Step: Making Your First Synced Ball Video in BallEngine
Here is the complete workflow from an empty studio to a finished vertical clip. Follow it in order the first time; once you understand each stage you will develop your own shortcuts. This is the exact process for how to make a bouncing ball synced to music inside BallEngine.
- Open the studio. Go to ballengine.app and launch the creator studio in your browser. Create a free account if you have not already so your work saves. If you want the guided version, the how it works page walks through the interface.
- Switch to Rhythmic Mode. From the mode selector, choose Rhythmic Mode. This is the mode that advances the melody one note per collision. Everything in this guide assumes Rhythmic is active.
- Open the Audio Studio and load your music. Either import a MIDI file of the melody you want the ball to play, or select a built-in musical scale and key. If it is your first video, pick a pentatonic scale so every bounce lands in tune.
- Choose a container and starting shape. Pick the arena the ball bounces inside, a circle, a rotating ring, a polygon, or one of the shaped containers. The container geometry controls how often the ball collides, which directly controls how quickly notes fire.
- Set your ball count and size. Start with a single ball for a clean, readable melody. You can add more balls later to layer notes into chords, but one ball first makes it easy to hear whether the sync feels right.
- Tune the physics so bounces land on the beat. This is the craft step. Adjust gravity, bounce elasticity (restitution), and ball speed so collisions happen at a musical, even cadence rather than a frantic rattle or a slow drift. Aim for bounces that feel like they are keeping time.
- Add an escalation so the clip builds. Enable the growth behavior so the container or ball changes over the clip, for example the ring slowly expanding. A build keeps viewers watching to see where it ends up.
- Preview and listen. Play the simulation and watch the notes advance. Check that the melody is recognizable (for MIDI) or pleasant (for scales) and that the bounce rhythm feels intentional. Tweak physics and replay until it clicks.
- Frame it vertical. Confirm the canvas is set to 9:16 vertical so it fits TikTok, Reels, and Shorts natively with no cropping.
- Record and export. Render the clip to video. Choose your resolution and frame rate, up to 4K at 60fps, then export the finished MP4.
- Publish or schedule. Send the clip straight to your platforms from inside BallEngine, or queue it with the built-in scheduler, or set recurring Autopilot posting so clips go out on a cadence without you.
Save your project before recording. A well-tuned physics setup is reusable: swap the MIDI or scale and you can turn one good template into a whole series of clips.
Tuning Physics So the Bounces Land on the Beat
The single biggest difference between an amateur clip and one that feels professional is bounce timing. A great synced ball video has collisions that feel rhythmic, spaced so the notes come out like a real performance rather than a stumble. BallEngine exposes over 1,000 editable physics parameters, but you only need to understand a handful to nail the timing.
The parameters that control rhythm
- Gravity. Higher gravity pulls the ball down faster, shortening the time between floor bounces and speeding up the melody. Lower gravity stretches the gaps and slows the tune.
- Restitution (bounciness). This is how much energy the ball keeps after each hit. High restitution keeps bounces tall and even; low restitution makes bounces decay and cluster together, which changes the note spacing over time.
- Ball speed. The raw velocity of the ball. Faster balls hit the walls more often, firing notes quicker. This is your main tempo dial.
- Container size and shape. A small ring produces frequent collisions and a busy melody; a large arena spaces bounces out. Corners and flat walls create predictable, repeatable hits, while curved walls create more varied timing.
- Container rotation. A spinning container changes where and when the ball strikes, and can turn an irregular bounce pattern into a steady, hypnotic beat.
A practical tuning loop
Do not try to solve timing in your head. Use this fast iteration loop instead: play the simulation, watch and listen for ten seconds, identify whether the notes are coming too fast, too slow, or unevenly, adjust one parameter, and replay. Change one thing at a time so you always know what caused the improvement. Within a few passes you will find a pocket where the bounces feel like they are keeping time with the melody.
- Get the tempo roughly right first using ball speed and container size.
- Even out the spacing with gravity and restitution so bounces are regular.
- Add rotation or a shaped container if you want a steadier, more repetitive beat.
- Only then add escalation, so the build does not fight the timing you just dialed in.
Tune tempo first, evenness second, drama last. Chasing all three at once is how good ideas turn into a rattling mess.
If you want to go deeper on the individual controls, the tutorials library breaks down specific parameters, and the getting started studio guide covers the interface end to end.
Choosing the Right Simulation Mode and Container
Rhythmic Mode is where the note-per-bounce magic lives, but it is not the only way to build a music sync bouncing ball simulation. BallEngine ships with dozens of simulation modes, and several of them pair beautifully with synced audio. The container and mode you pick shape the story of the clip as much as the song does.
Modes that work well with music
| Mode | What it does | Why it suits synced audio |
|---|---|---|
| Rhythmic | Advances one note per collision | The core music sync engine; start here |
| Escape | Ball tries to break out of a shrinking or opening container | Rising tension pairs with a building melody |
| Ghost Escape | A variant escape with a chasing dynamic | Adds suspense while notes climb |
| Breaker | Ball smashes through bricks or layers | Each break can trigger a note, dense and punchy |
| Spiral | Ball travels a spiral path | Even, predictable collisions make a steady beat |
| Plinko | Ball cascades through a peg field | Rapid, layered collisions stack notes fast |
| Merge 2048 | Balls combine into larger numbered balls | Merges become musical events with a goal to watch |
| Marble Run | Ball rolls a track hitting features | Track features act like keys on an instrument |
For your first few videos, stay in Rhythmic Mode so the note-per-bounce relationship is obvious. Once you are comfortable, the Escape mode is a natural next step because its built-in tension arc gives your melody somewhere to go. Explore the others as you find your style; each one changes the rhythm of collisions and therefore the character of the performance.
Match the mode to the song's shape. A melody that builds to a climax wants a mode with escalation like Escape. A steady, looping riff wants an even mode like Spiral or a rotating ring.
Adding an Escalation So the Clip Builds and Holds Attention
A flat clip where nothing changes gets scrolled past. The most-watched synced ball videos have an arc: they start small and simple, then something grows, speeds up, or intensifies as the song progresses, and they resolve at a satisfying peak. This build is what keeps a viewer's thumb still for the full forty seconds, which in turn signals the platform to push your clip to more people.
- Growing container. The classic move: a ring that slowly expands, so the ball has more room and the physics visibly change as the song plays out.
- Accelerating ball. The ball gets faster over time, firing notes more rapidly toward the climax of the melody.
- Multiplying balls. New balls spawn as the clip progresses, layering notes into fuller chords and richer texture.
- Rising stakes. In Escape-style modes, the container opens or shrinks so the outcome feels genuinely in doubt until the end.
The principle behind all of these is simple: give the viewer a reason to wait for the ending. A synced ball clip that plainly escalates makes a promise, that something is building toward a payoff, and paying that promise off is what earns the replay and the share. For a deeper look at why this works on short-form platforms, the viral growth blueprint breaks down the attention mechanics in detail.
Recording and Exporting a Clean 9:16 Video
Once the simulation looks and sounds right, exporting is the easy part, but a few settings make the difference between a clip that looks native on mobile and one that looks amateur.
- Confirm the aspect ratio is 9:16 vertical before you record, so the video fills a phone screen with no black bars or awkward cropping.
- Pick a resolution appropriate to your plan. Higher resolutions look crisper on modern phones; the free tier is enough to start, and paid tiers unlock the highest output.
- Choose 60fps for the smoothest motion. Bouncing balls move fast, and the extra frames make the physics read as fluid rather than choppy.
- Record the full performance, including a beat of lead-in and a clean ending on the payoff, so the loop feels complete.
- Export the MP4 and give it a descriptive filename so it is easy to find when you publish.
BallEngine exports vertical video up to 4K at 60fps, which is more than enough headroom for TikTok, Reels, and Shorts. You do not need to chase the absolute highest resolution for every clip; a clean, well-framed 1080p vertical at 60fps performs beautifully and exports faster. Reserve 4K for hero pieces where the extra sharpness genuinely shows.
Keep your best clip at native platform length. For most feeds a tight 20 to 45 second clip that starts, builds, and resolves outperforms a long one that overstays the payoff.
Publishing and Scheduling Your Clips
Making the video is half the job; getting it in front of people is the other half, and this is where an integrated studio saves enormous time. Rather than exporting, downloading, and uploading to each app by hand, BallEngine can publish for you.
- Direct publishing. Send a finished clip straight to TikTok, YouTube, Instagram, Facebook, Threads, Pinterest, X, and Snapchat without leaving the studio.
- Scheduling. Queue clips to go out at set times so you can batch a week of content in one session.
- Autopilot. Set recurring publishing so new clips post on a cadence automatically, ideal for a faceless channel you want to run in the background.
This matters more than it first appears. The creators who grow with this format are not the ones who make a single brilliant clip; they are the ones who post consistently. Being able to render in the browser and then schedule or Autopilot the output means one focused session can feed your channel for days. If you are targeting a specific platform, the YouTube Shorts generator workflow is tuned for that format specifically.
Common Mistakes and How to Avoid Them
Almost every beginner clip fails in one of a small number of predictable ways. Knowing them in advance saves you a lot of trial and error.
- Bounces too fast. When the ball rattles, notes blur into noise. Slow the ball, enlarge the container, or lower gravity until individual bounces are distinct.
- No build. A clip where nothing changes has no reason to be watched to the end. Always add some escalation, even a slow-growing ring.
- Unrecognizable melody. If you imported a full multi-track MIDI, the note order can get muddy. Use a MIDI of just the lead melody line for a clean, hummable result.
- Sour notes with scales you did not expect. Some scales are more consonant than others. If a scale sounds off, switch to pentatonic, which is forgiving in any order.
- Wrong aspect ratio. Recording in landscape and cropping later wastes resolution and looks unprofessional. Set 9:16 before you record.
- Overlong clips. A melody that drags past its payoff loses viewers. End on the peak, not after it.
If you are still comparing tools before committing to a workflow, the roundup of the best ball simulation software of 2026 covers where BallEngine fits and what to look for in a dedicated music ball simulator.
Why a Dedicated Tool Beats Piecing It Together Yourself
You can technically approximate this effect by combining a generic physics playground, a separate synth, and a video editor. Creators tried that route for years. The reason purpose-built studios took over is that the sync problem, making the right note fire on the right collision, is genuinely hard to solve by hand and trivial when the tool does it for you.
A music ball simulator built for this format handles the note pointer, the MIDI parsing, the in-tune scale generation, the spatial audio, the vertical framing, and the export pipeline as one coherent system. You spend your creative energy on the parts that actually differentiate your clips, the song choice, the physics feel, and the build, instead of fighting file formats and timelines. With 1,000-plus editable parameters underneath, you never hit a ceiling as your ambitions grow, but you also do not have to touch any of them to make your first video.
The best tool for a niche format is the one that makes the hard part invisible and leaves the creative part in your hands.
Frequently Asked Questions
Can I make a bouncing ball play any song?
Do I need a MIDI file to do this?
Do I need to know how to code?
Is it free to start?
Is it copyright safe to use a song?
What is the best song length for one of these videos?
How do I get the bounces to land on the beat?
Does every render sound exactly the same?
Can I add more than one ball for chords?
What resolution should I export at?
Can I post the videos automatically?
Do I need any music or animation experience?
Start Making Your First Synced Ball Video
You now understand the whole picture: how collisions become musical triggers, when to reach for MIDI versus a scale, how to tune physics so the bounces keep time, which modes and builds hold attention, and how to export and publish a clean vertical clip. The only step left is to make one. Open the music ball simulator, pick Rhythmic Mode, load a scale or a MIDI, and give yourself fifteen minutes to feel how the pieces fit together. Your first clip will teach you more than another hour of reading. Ready to build? Sign up free and make a bouncing ball play its first song today.
The mode in this article
All modes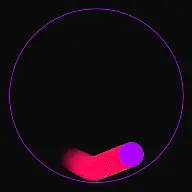
Tutorials for this topic
All tutorialsRelated articles
View all articles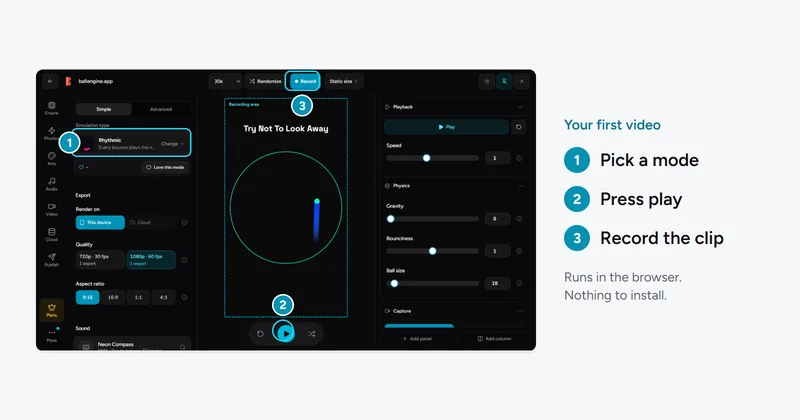
Getting Started With BallEngine Creator Studio: The Complete Beginner's Guide
New to BallEngine? This complete beginner guide walks you from opening the studio to publishing your first video, the interface, the core modes, physics parameters, music sync, recording, and export.
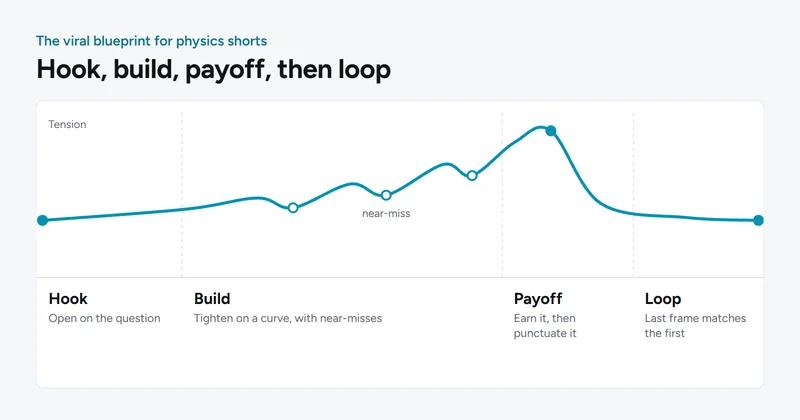
The Viral Physics Video Blueprint: How Satisfying Simulations Get Millions of Views
A tactical masterclass on engineering retention and shares for physics videos, hook formulas, tension-release, sound design, seamless loops, captions, hashtags, and reading your analytics.